Maximizing Drone Flight Efficiency & Battery Management
Mavic 3 Enterprise Drone Batteries
Introduction
One of the biggest challenges drone pilots face, especially when providing professional drone services, is ensuring we have enough battery power to complete our missions without (unnecessary) downtime. But how many batteries is enough? Buying more batteries will definitely get you more flight time, but is that the best, most efficient solution for commercial drone operations? This post will break down the real-world battery performance of the Mavic 3 Enterprise and how you can optimize your charging setup to reduce unnecessary wait times for battery charging.
The DJI Mavic 3 Enterprise series drones come with 1 intelligent flight battery and 100 watt charger but you can buy additional kits of 3 batteries which include another 100w charger. The DJI M300 and M350 drones do not come standard with any batteries and each need to be purchased separately.
These intelligent flight batteries are also not exactly cheap, so just buying a boat load of them and calling it a day, may not be the best option. These intelligent batteries have small onboard computer chips and are why they are "intelligent". While they are loaded with features, including the ability to self discharge over time to a safe voltage, they still require routine maintenance checks, logs and proper care and storage.
Quick Summary:
1C-15B (1 Charger, 15 Batteries) – Best for continuous flight with one charger.
2C-4B (2 Chargers, 4 Batteries) – The most efficient setup with no downtime.
2C-5B (2 Chargers, 5 Batteries, Double Cooling) – Ideal for hot weather conditions.
Charging bottlenecks happen when flight time is shorter than charge time – Optimizing battery management reduces downtime.
Adding a second charger is more effective than adding more batteries.
All configurations listed are the absolute minimum number of batteries to eliminate downtime. If your budget and fleet management allows, having more batteries than the minimum is always the best choice for flexibility and reliability.
Battery Flight Times
One of the challenges with trying to understand battery flight time estimates is that their advertised flight times are much higher than what you will get in the real-world flying conditions outdoors.
DJI’s advertised battery specifications were tested in ideal conditions, indoors with no wind and with the drone flight maintaining a constant speed. This is far from real world flying in variable wind conditions, altitude changed, flight maneuvers, etc.
For example, the Mavic 3E intelligent flight batteries (BWX260-5000-15.4) have an advertised flight time of 45 minutes. But from my experience flying the Mavic 3 series drones since 2022, this number is more like 25 minutes (on average), depending on the weather, environment, etc.
The 25 minute flight times were extracted from my flight logs from 2022 until Feb 12, 2025 using the DJI Mavic 3, Mavic 3E, Mavic 3T, and Mavic 3 Pro. I only included flights that took off with a minimum of 98% battery and landing between 14-20% battery. In many flights this is using the smart return-to-home function which lands with approximately 14-20%.
Some flights, like with the Mavic 3 Pro are flown heavily in sport mode, therefore some flights are only 21-22 minutes, whereas some of the Mavic 3T flights are flown slowly allowing flight for nearly 31 minutes.
These flights were flown using the same 12 batteries, which the batteries were purchased at different times, so some flights were on brand new batteries and some were on batteries with more cycles.
All 12 batteries are in good health.
Battery Charging Times
Two Intelligent Flight Batteries Charging on the 100W Charging Hub
Using the Mavic 3E again as an example, the intelligent flight battery (BWX260-5000-15.4) has an estimated 70 minutes to charge fully using the 100w charger via M3E manual. The first time charging the battery will be about 80 minutes since they are shipped in hibernation mode, which is less than 5% battery.
From real-world testing using the 100W charger and charging hub, the charging time is closer to 50 minutes for a battery that has been flown in the M3E/T down to the 14-20% battery range after a real world flight using RTH.
I tested this using the 100W charger and charging hub plugged into 120V-15A receptacle and only the charging hub plugged into C1 of the 100w charger using the included 100w USB-C charging cable. No other device was plugged into C2 of the charging hub. The charging hub actually draws around 109 watts in this configuration and charges a battery from 17% to 100% in about 50m.
Battery Cool Down
After changing the batteries in the drone, you can’t simply put the drained battery onto the charger immediately since they will have an elevated temperature. The batteries need to cool down to operating temperature before you can charge them. For the M3E intelligent flight battery this range is 5°C to 40°C (41°F to 104°F).
The time it takes to cool will vary depending on where you are cooling them. I always try to cool my batteries naturally in a room temperature environment, around 22°C.
The longer you fly the battery, the hotter it will become. Usually after 15 minutes of flying the battery will have reached 40°C, and will continue to get hotter the longer you fly. This is just a rule of thumb and will depend again on how hard you are pushing the drone and the temperature, altitude, above sea level, etc you are flying.
I have found that the M3E intelligent flight batteries cool about 5° to 6° every 10 minutes when cooled in a room temperature environment, around 22°C.
I have at least 1 battery in the “cooling phase” during all missions. Once I land the drone for the next battery swap, I put this battery into the “cooling phase” and the battery that was just in the cooling phase goes onto the charger for the “charging phase”.
The cooling phase will change depending on the weather, my charging environment and the type of flights I am doing, (Mapping, inspection, video, etc). For instance in the heat of summer I may increase 2 batteries at a time in cooling phase to give a bit more time for the batteries to cool down.
Theoretical vs Real-world Battery Phases
Now that we have covered flight, cooling and charging times, lets quicky compare how theoretical expectations are different than real-world performance.
| Battery Cycle Phase | Theoretical | Real-world |
|---|---|---|
| Flight Time | 45 minutes | 25 minutes |
| Cooling | 45 minutes | 25 minutes |
| Charging | 70 minutes | 50 minutes |
The Bottleneck: Flight Times vs Charge Times
When comparing both theoretical and real world charts, you can clearly see that charging time is longer than flight time in both cases. You will be draining batteries faster than you can charge them which will eventually create a bottleneck.
This may not be an issue on smaller flights, but on larger mapping and inspection jobs and longer days out in the field, this definitely becomes an issue.
As a UAS / RPAS pilot, you do not want to be sidelined due to lack of available, charged batteries, so making sure you have enough fully charged batteries to keep your drone from sitting and waiting is very important.
Key Insight: In both the theoretical and real-world scenarios, the charging time is longer than the flight time, which creates a bottleneck.
The challenge: Batteries drain faster than they charge, leading to potential downtime.
Solution: Strategic battery and charger management can reduce downtime.
Theoretical vs. Real-World Drone Battery Performance
How Many Batteries Do You Need for Continuous Drone Flights?
For these comparisons I will use the times from Figure 1.
And just to be clear, these comparisons are not for knocking the advertised specs from any drone manufacturers. The goal is to show the data to understand how real world conditions can alter how you may budget your purchases for battery and charger combinations to meet the requirements of your flights.
So let’s compare the data.
We will start comparing the theoretical phases with the real-world phases to see how they differ and will determine how many batteries and chargers you need.
To determine the ideal number of batteries, I ran calculations based on our real-world flight and charging times.
The flight times were extracted using AirData UAV which helps me with drone fleet management for our enterprise drone solutions.
The results are quite clear, the more chargers you have, the fewer batteries you need for continuous operations.
Comparison
First let’s compare the theoretical and real-world battery phases between for a 1 Charger and 4 Battery (1C-4B) Setup (Figures 1A-1B). This is a standard setup as the DJI Mavic 3 Enterprise Series Battery Kit comes with 3 batteries and 1 charger, plus the battery that comes with the Mavic 3 Enterprise.
*The 12-hour battery timeline presented in these charts is for reference and comparison only. At Holland Productions, no pilot shall have PIC duties longer than 10 hours per day. To ensure safety and minimize fatigue:
Every 2 hours of continuous flying the PIC must take a minimum 30-minute break.
After 4 hours of total flight time, a minimum 60 minute break is required.
Additional rest periods may be scheduled as needed to maintain safe operations.
For longer missions, PIC' duties are shared between pilots to manage pilot fatigue.
In the Figure 1, you see all 4 batteries are charged and ready to be flown. Starting with battery 1, flying for 45 minutes(blue), taking the battery out of the drone, putting it into the cooling phase (orange) and then putting battery 2 in the drone and flying for 45 minutes.
Once the drone lands from the second flight with battery 2, we take out battery 2, put it into cooling (orange), and take battery 1 that has now cooled for 45 minutes and put it in to charging phase (red) on the 100W charging hub.
These are the battery phases in the charts and the logic that is applied.
Bottleneck
Theoretical (Figure 1)
The first bottleneck in Figure 1 starts with the 6th flight, or the second flight on battery 2. There is a 5 minute wait for battery 2 to be done charging.
The bottleneck increases on battery 3, to 25 minutes and this is where the charger cannot keep up and the 25 min bottleneck stay for all remaining flights.
Real-world (Figure 2)
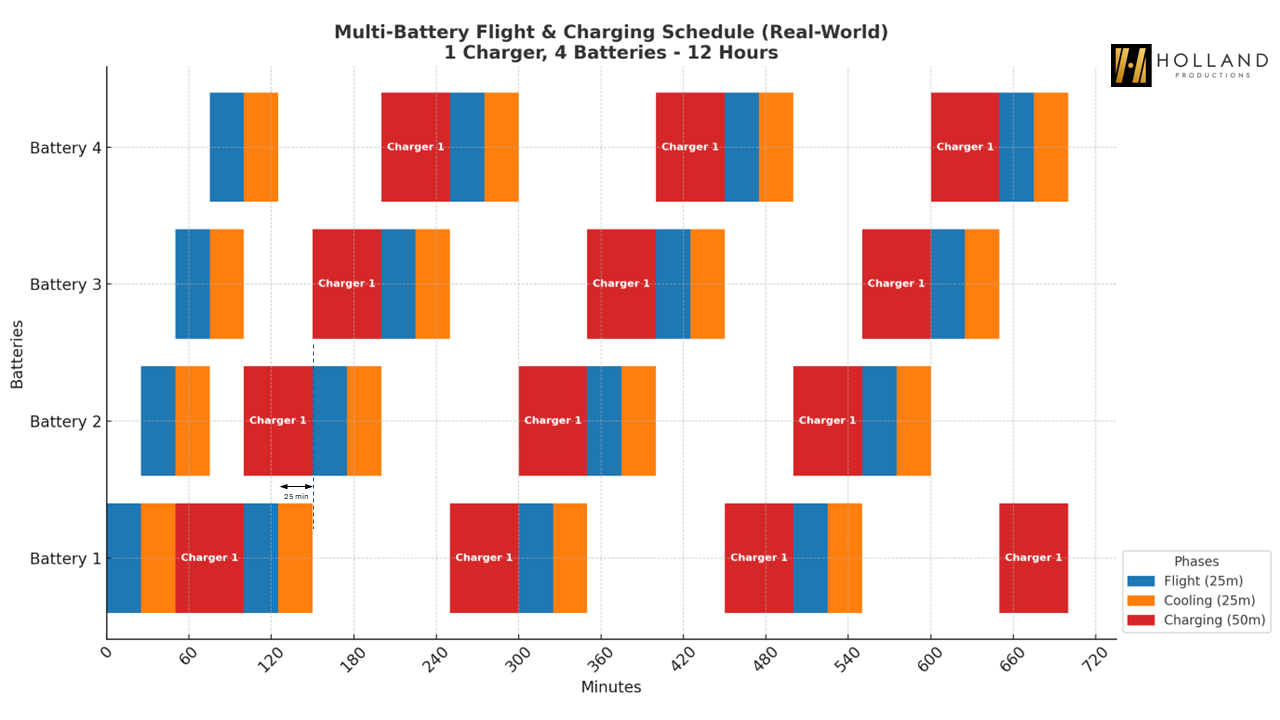
Similarly to Figure 1, the bottleneck starts with flight # 6 but is a 25 min wait, and continues at 25 for all remaining flights.
Figure 1 - Theoretical - 1 Charger, 4 Battery Configuration
Figure 2- Real-world - 1 Charger, 4 Battery Configuration
| Theoretical (Figure 1) | Real-world (Figure 2) | |
|---|---|---|
| Flights | 12 | 16 |
| Total Flight Time | 540 minutes | 400 minutes |
| Flight Downtime | 180 minutes | 320 minutes |
| Configuration | 1C-4B (1 Charger, 4 Battery) | 1C-4B (1 Charger, 4 Battery) |
As you can see with the same setup 1C-4B, there is a big discrepancy between theoretical and real-world battery flight times and charging cycles.
So the key point I am trying to make is don’t plan around advertised flight times as you will come up short. Unless you purchased a boat load of extra batteries, you may be waiting around a lot more than anticipated.
Next let’s look at how many extra batteries we would need to match the 540 min flight time from the theoretical/advertised flight times.
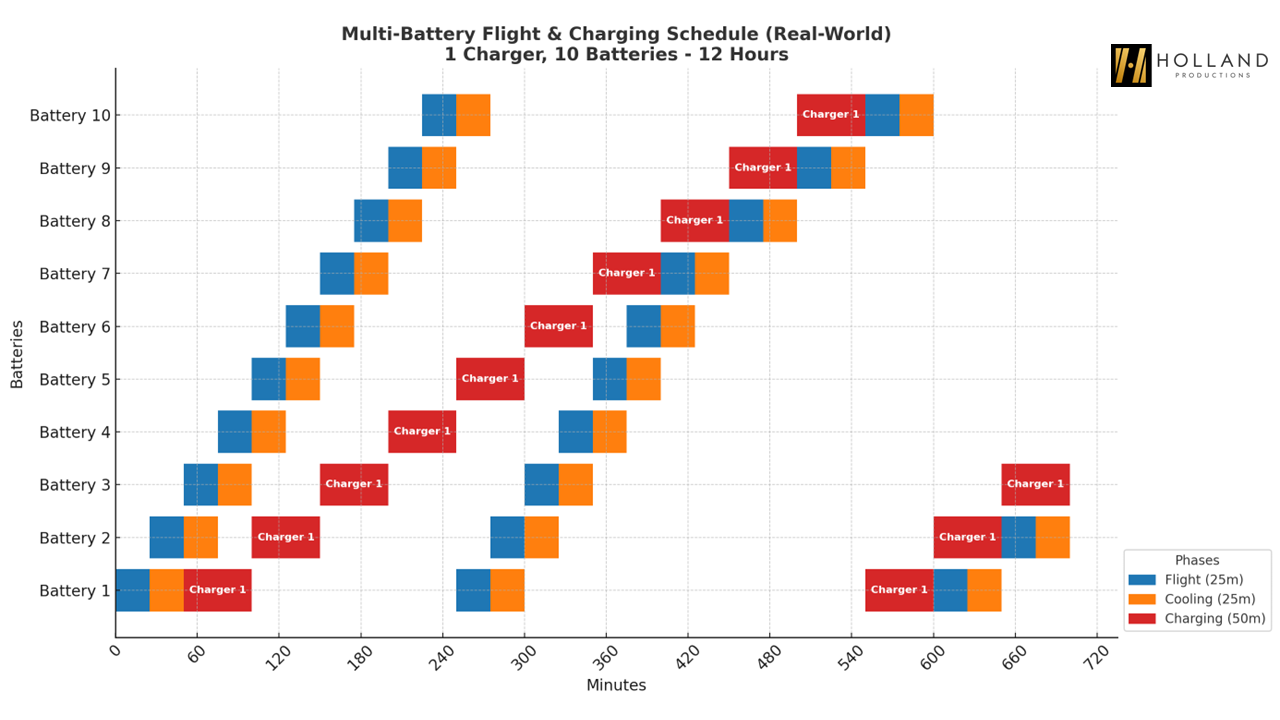
Figure 3 - Real-world - 1 Charger, 10 Battery Configuration
Wow! You need 10 batteries to match the flight time of the 1C-4B advertised times. Not to mention 22 battery swaps versus 12.
| Theoretical (Figure 1) | Real-world (Figure 3) | |
|---|---|---|
| Flights | 12 | 22 |
| Total Flight Time | 540 minutes | 550 minutes |
| Flight Downtime | 180 minutes | 170 minutes |
| Configuration | 1C-4B (1 Charger, 4 Battery) | 1C-10B (1 Charger, 10 Battery) |
Achieving Zero Downtime
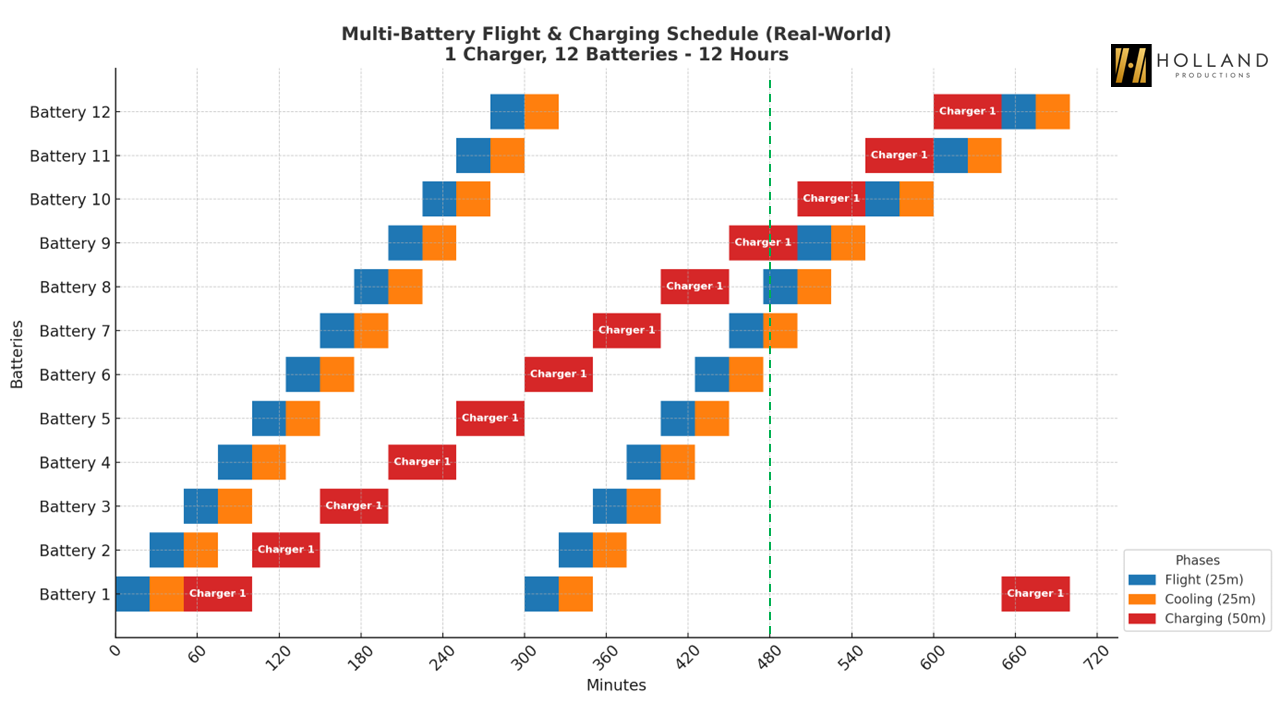
Now let’s check the minimum number of batteries needed to achieve zero downtime for 8 hours (480 min), shown with the dotted green line. While these numbers represent the absolute bare minimum required to eliminate downtime, and having extra batteries beyond this minimum will provide much more flexibility, efficiency, and safety for real-world operations.
Again, this is not a practical real-world scenario, we are only using real-world battery cycle times here.
In this made-up scenario, there would be to PIC’s rotating to take breaks, but they need to keep the drone flying to get the mission done.
From Figure 3 (1C-10B) we can see that the bottleneck starts on Flight 18, which is Battery #8’s second flight. It’s charge is only complete after 25 minutes of the previous flight ending. So there is a 25 min wait time.
Lets see if adding an additional battery will fix the bottlneck (1C-11B):
Figure 4 - Real-world - 1 Charger, 12 Battery Configuration
Yes, adding another battery, for a total of 12 allows for 8 hours of consecutive flights with no wait times.
Adding Another Charger
For large-scale operations like remote drone inspections or 3D drone mapping, adding a second charger can make a huge difference in reducing downtime. Let’s see what happens when we add a second charger to the mix."
Figure 5 - Real-world - 2 Charger, 12 Battery Configuration
It’s clear adding a second charger, removes any type of charging bottleneck. From this chart, you can see that the 2C-12B setup exceeds the 8 hours, and easily provides 12 hours of continuous flights.
Charger Efficiencies
Let’s check what the absolute minimum number of batteries we would need to achieve the 8 hour flights with zero downtime, using 2 Charger Setup.
Figure 6 - Real-world - 2 Charger, 4 Battery (2C-4B) Configuration
Using the real-world average of 25 minute flight time and 50 minute charging time, the 2 charger, 4 battery configuration (2C-4B) is the setup with the bare minimum number of batteries required to achieve zero charging wait time.
And here is what the chart looks like with the flight times randomized in the typical range of the actual flight times:
Figure 7 - Real-world - 2 Charger, 4 Battery (2C-4B) Configuration (Randomized Flight times)
Under normal flying conditions, this setup works well. However, as we discussed earlier there are conditions that will affect these times:
Reduce Flight Times (even further):
Flying in very windy weather (>10m/s) (use our wind speed converter here)
Flying in cold weather (-10° to 5°)
Flying aggressively in Sport mode
Increase Cooling Times
Flying in high heat (32° to 40°)
Flying aggressively in Sport mode.
Pushing the RTH beyond recommended setting.
Draining the battery below 20%
Increase Charging Times
Not using an approved 100W USB-C Charging Cable
Not using an approved 100W Charger (USB-C Vehicle Lighter Charger)
Charging two devices on the 100W charger (RC Pro, Charging Hub, etc.)
Here in Canada when I am flying large commercial drone operations like aerial mapping missions, LiDAR drone surveys or complex 3D building surveys in mid-summer, I will typically have at least 2 batteries in cooling instead of one. Also on long days of video shoots with the Mavic 3 Pro where I will fly in Sport Mode most of the time, the batteries can get over 50°C by the end of the flight.
I try my best not to fly the batteries below 22% in this scenario, because as I mentioned, the longer the flight, the hotter the battery becomes which means it will take longer to cool to operation temperatures as well. This means even more battery swaps as flights are only 18-22 minutes. With two batteries in cooling at any given time, each battery is cooling for 36-44 minutes.
Let’s take a look at the previous chart configuration with 2 chargers and 4 batteries (2C-4B).
Figure 8 - Real-world - 2 Charger, 4 Battery (2C-4B), Double Cooling Configuration
With 2 batteries cooling, and each battery cooling for 50 minutes, we now have 25 minute downtime after each 1-4 battery cycle.
To mitigate the downtime we only need to add 1 more battery. Here is the 2C-5B (2 battery cooling) chart:
Figure 9 - Real-world - 2 Charger, 5 Battery (2C-5B), Double Cooling Configuration
As you can see, with 5 batteries, we are able to have 2 batteries cooling at all times and still achieve zero downtime. This is the most efficient summertime setup to keep batteries rotating and reduce the number of batteries needed per drone.
Conclusion
We’ve looked at a few of the Charger-Battery configurations and how this impacts real-world drone operations. For drone operations requiring long flight times with minimal downtime (Drone Survey’s, Drone Inspections, etc.) this data can be helpful to understand how different charger and battery configurations can provide the power to keep your operations going.
We used a 12-hour time frame for the purposes of comparison between the configurations.
Key Takeaways:
1 Charger-15 Batteries (1C-15B) achieves zero downtime under normal conditions.
2 Chargers & 4 Batteries (2C-4B) achieves zero downtime under normal conditions.
2 Chargers & 5 Batteries (2C-5B achieves zero downtime with extended cooling for summer heat.
Optimizing battery & charger setups is essential for minimizing unnecessary downtime for drone operations. If you’re looking to maximize flight efficiency, start by tracking your real-world battery data and adjusting your setup accordingly.
While we’ve determined the minimum number of batteries and chargers required to eliminate pilot downtime, it’s very important to note that these are just the baseline requirements. In real-world missions, other factors like unexpected delays and environmental factors can occur. If your budget and logistics allow, having extra batteries beyond the minimum will always be the safest approach.


